Angular 2 表单
本章节我们将为大家介绍如何使用组件和模板构建一个 Angular 表单。
利用 Angular 模板,我们可以创建各种类型表单,例如:登录表单,联系人表单,商品详情表单等,而且我们也为这些表单的字段添加数据校验。
接下来我们一步步来实现表单的功能。
创建项目
导入初始化项目。
完整的项目创建可以参考:
Angular 2 TypeScript 环境配置
或者直接下载源代码:
点我下载
解压后,修改目录名为angular-forms,修改 angular-forms/package.json 文件中的
"name": "angular-quickstart"
为
"name": "angular-forms"
。
完成后,我们执行
cnpm install
来载入依赖包。
创建 Site 模型
以下创建了一个简单的模型类 Site,包含了三个必需字段:id,name,url,一个可选字段:alexa。
在 angular-forms/app 目录下创建 site.ts 文件,代码如下:
app/site.ts 文件:
export
class
Site
{
constructor
(
public
id
:
number
,
public
name
:
string
,
public
url
:
string
,
public
alexa
?:
number
)
{
}
}
以下代码中,标为 public 的为公有字段,alexa 后添加一个问号(?)表示可选字段。
创建一个表单组件
每个 Angular 表单分为两部分:一个基于 HTML 的模板,和一个基于代码的组件,它用来处理数据和用户交互。
在 angular-forms/app 目录下创建 site-form.component.ts 文件,代码如下:
app/site-form.component.ts 文件:
import
{
Component
}
from
'
@angular/core
'
;
import
{
Site
}
from
'
./site
'
;
@
Component
(
{
moduleId
:
module
.
id
,
selector
:
'
site-form
'
,
templateUrl
:
'
site-form.component.html
'
}
)
export
class
SiteFormComponent
{
urls
=
[
'
www.yssmx.com
'
,
'
www.google.com
'
,
'
www.taobao.com
'
,
'
www.facebook.com
'
]
;
model
=
new
Site
(
1
,
'
云搜索MX教程
'
,
this
.
urls
[
]
,
10000
)
;
submitted
=
false
;
onSubmit
(
)
{
this
.
submitted
=
true
;
}
get
diagnostic
(
)
{
return
JSON
.
stringify
(
this
.
model
)
;
}
}
实例中导入了 Component 装饰器和 Site 模型。
@Component 选择器 "site-form" 表示我们可以通过一个
<site-form>
标签,把此表单扔进父模板中。
templateUrl 属性指向一个独立的HTML模板文件,名叫 site-form.component.html。
diagnostic 属性用于返回这个模型的JSON形式。
定义应用的根模块
修改 app.module.ts 来定义应用的根模块,模块中指定了引用到的外部及声明属于本模块中的组件,比如 SiteFormComponent。
因为模板驱动的表单有它们自己的模块,所以我们得把 FormsModule 添加到本应用的 imports 数组中,这样我们才能使用表单。
app/app.module.ts 文件代码如下
app/app.module.ts 文件:
import
{
NgModule
}
from
'
@angular/core
'
;
import
{
BrowserModule
}
from
'
@angular/platform-browser
'
;
import
{
FormsModule
}
from
'
@angular/forms
'
;
import
{
AppComponent
}
from
'
./app.component
'
;
import
{
SiteFormComponent
}
from
'
./site-form.component
'
;
@
NgModule
(
{
imports
:
[
BrowserModule
,
FormsModule
]
,
declarations
:
[
AppComponent
,
SiteFormComponent
]
,
bootstrap
:
[
AppComponent
]
}
)
export
class
AppModule
{
}
创建根组件
修改根组件文件 app.component.ts,将 SiteFormComponent 放在其中。
app/app.component.ts 文件:
import
{
Component
}
from
'
@angular/core
'
;
@
Component
(
{
selector
:
'
my-app
'
,
template
:
'
<site-form></site-form>
'
}
)
export
class
AppComponent
{
}
创建一个初始 HTML 表单模板
创建模板文件 site-form.component.html ,代码如下所示:
app/site-form.component.html 文件:
<
div
class
=
"
container
"
>
<
h1
>
网站表单
</
h1
>
<
form
>
<
div
class
=
"
form-group
"
>
<
label
for
=
"
name
"
>
网站名
</
label
>
<
input
type
=
"
text
"
class
=
"
form-control
"
id
=
"
name
"
required
>
</
div
>
<
div
class
=
"
form-group
"
>
<
label
for
=
"
alexa
"
>
alexa 排名
</
label
>
<
input
type
=
"
text
"
class
=
"
form-control
"
id
=
"
alexa
"
>
</
div
>
<
button
type
=
"
submit
"
class
=
"
btn btn-default
"
>
提交
</
button
>
</
form
>
</
div
>
required 属性设置的该字段为必需字段,如果没有设置则是可选。
在 angular-forms 目录下输入以下命令:
cnpm install bootstrap --save
打开 index.html 文件,把以下样式链接添加到 <head> 中:
<
link
rel
=
"
stylesheet
"
href
=
"
node_modules/bootstrap/dist/css/bootstrap.min.css
"
>
执行
npm start
后,访问:http://localhost:3000/,输出效果如下:

使用 ngModel 进行双向数据绑定
接下来我们使用 ngModel 进行双向数据绑定,通过监听 DOM 事件,来实现更新组件的属性。
修改 app/site-form.component.html ,使用 ngModel 把我们的表单绑定到模型。代码如下所示:
app/site-form.component.html 文件:
<
div
class
=
"
container
"
>
<
h1
>
网站表单
</
h1
>
<
form
>
{{diagnostic}}
<
div
class
=
"
form-group
"
>
<
label
for
=
"
name
"
>
网站名
</
label
>
<
input
type
=
"
text
"
class
=
"
form-control
"
id
=
"
name
"
required
[(
ngModel
)]=
"
model.name
"
name
=
"
name
"
>
</
div
>
<
div
class
=
"
form-group
"
>
<
label
for
=
"
alexa
"
>
alexa 排名
</
label
>
<
input
type
=
"
text
"
class
=
"
form-control
"
id
=
"
alexa
"
[(
ngModel
)]=
"
model.alexa
"
name
=
"
alexa
"
>
</
div
>
<
div
class
=
"
form-group
"
>
<
label
for
=
"
url
"
>
网站 URL
</
label
>
<
select
class
=
"
form-control
"
id
=
"
url
"
required
[(
ngModel
)]=
"
model.url
"
name
=
"
url
"
>
<
option
*
ngFor
=
"
let p of urls
"
[
value
]=
"
p
"
>
{{p}}
</
option
>
</
select
>
</
div
>
<
button
type
=
"
submit
"
class
=
"
btn btn-default
"
>
提交
</
button
>
</
form
>
</
div
>
运行以上实例输出结果如下:
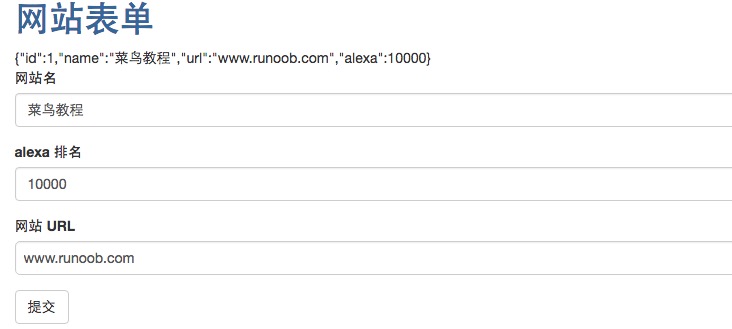
{{diagnostic}}
只是用于测试时候输出数据使用。
我们还可以通过 ngModel 跟踪修改状态与有效性验证,它使用了三个 CSS 类来更新控件,以便反映当前状态。
|
状态
|
为 true 时的类
|
为 false 时的类
|
|
控件已经被访问过
|
ng-touched
|
ng-untouched
|
|
控件值已经变化
|
ng-dirty
|
ng-pristine
|
|
控件值是有效的
|
ng-valid
|
ng-invalid
|
这样我们就可以添加自定义 CSS 来反应表单的状态。
在 angular-forms 目录下创建 forms.css 文件,代码如下:
forms.css 文件:
.ng-valid
[
required
]
,
.ng-valid
.required
{
border-left:
5
px
solid
#42A948
;
}
.ng-invalid
:not
(
form
)
{
border-left:
5
px
solid
#a94442
;
}
打开 index.html 文件,把以下样式链接添加到 <head> 中:
<
link
rel
=
"
stylesheet
"
href
=
"
forms.css
"
>
修改 app/site-form.component.html ,代码如下所示:
app/site-form.component.html 文件:
<
div
class
=
"
container
"
>
<
h1
>
网站表单
</
h1
>
<
form
>
{{diagnostic}}
<
div
class
=
"
form-group
"
>
<
label
for
=
"
name
"
>
网站名
</
label
>
<
input
type
=
"
text
"
class
=
"
form-control
"
id
=
"
name
"
required
[(
ngModel
)]=
"
model.name
"
name
=
"
name
"
#
name
=
"
ngModel
"
>
<
div
[
hidden
]=
"
name.valid || name.pristine
"
class
=
"
alert alert-danger
"
>
网站名是必需的
</
div
>
</
div
>
<
div
class
=
"
form-group
"
>
<
label
for
=
"
alexa
"
>
alexa 排名
</
label
>
<
input
type
=
"
text
"
class
=
"
form-control
"
id
=
"
alexa
"
[(
ngModel
)]=
"
model.alexa
"
name
=
"
alexa
"
>
</
div
>
<
div
class
=
"
form-group
"
>
<
label
for
=
"
url
"
>
网站 URL
</
label
>
<
select
class
=
"
form-control
"
id
=
"
url
"
required
[(
ngModel
)]=
"
model.url
"
name
=
"
url
"
>
<
option
*
ngFor
=
"
let p of urls
"
[
value
]=
"
p
"
>
{{p}}
</
option
>
</
select
>
</
div
>
<
button
type
=
"
submit
"
class
=
"
btn btn-default
"
>
提交
</
button
>
</
form
>
</
div
>
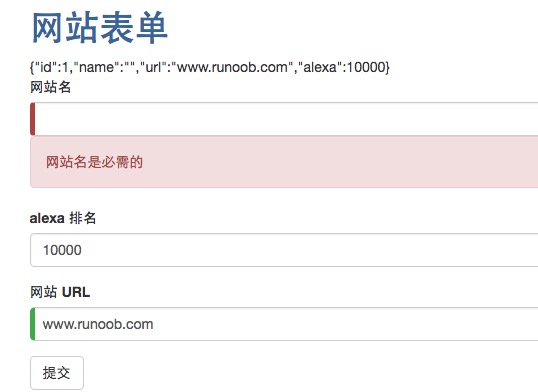
模板中通过把 div 元素的 hidden 属性绑定到 name 控件的属性,我们就可以控制"name"字段错误信息的可见性了。
删除掉 name 字段的数据,显示结果如下所示:
添加一个网站
接下来我们创建一个用于添加网站的表单,在 app/site-form.component.html 添加一个按钮:
app/site-form.component.html 文件:
<
button
type
=
"
button
"
class
=
"
btn btn-default
"
(
click
)=
"
newSite()
"
>
添加网站
</
button
>
将以上按钮事件绑定到组件方法上:
app/site-form.component.ts 文件:
active
=
true
;
newSite
(
)
{
this
.
model
=
new
Site
(
5
,
'
'
,
'
'
)
;
this
.
active
=
false
;
setTimeout
(
(
)
=>
this
.
active
=
true
,
)
;
}
我们给组件添加一个 active 标记,把它初始化为 true 。当我们添加一个新的网站时,它把 active 标记设置为 false , 然后通过一个快速的 setTimeout 函数迅速把它设置回 true 。
通过 ngSubmit 来提交表单
我们可以使用 Angular 的指令 NgSubmit 来提交表单, 并且通过事件绑定机制把它绑定到 SiteFormComponent.submit() 方法上。
<
form
*
ngIf
=
"
active
"
(
ngSubmit
)=
"
onSubmit()
"
#
siteForm
=
"
ngForm
"
>
我们定义了一个模板引用变量 #siteForm ,并且把它初始化为 "ngForm" 。
这个 siteForm 变量现在引用的是 NgForm 指令,它代表的是表单的整体。
site-form.component.ts 文件完整代码如下:
app/site-form.component.ts 文件:
import
{
Component
}
from
'
@angular/core
'
;
import
{
Site
}
from
'
./site
'
;
@
Component
(
{
moduleId
:
module
.
id
,
selector
:
'
site-form
'
,
templateUrl
:
'
site-form.component.html
'
}
)
export
class
SiteFormComponent
{
urls
=
[
'
www.yssmx.com
'
,
'
www.google.com
'
,
'
www.taobao.com
'
,
'
www.facebook.com
'
]
;
model
=
new
Site
(
1
,
'
云搜索MX教程
'
,
this
.
urls
[
]
,
10000
)
;
submitted
=
false
;
onSubmit
(
)
{
this
.
submitted
=
true
;
}
get
diagnostic
(
)
{
return
JSON
.
stringify
(
this
.
model
)
;
}
active
=
true
;
newSite
(
)
{
this
.
model
=
new
Site
(
5
,
'
'
,
'
'
)
;
this
.
active
=
false
;
setTimeout
(
(
)
=>
this
.
active
=
true
,
)
;
}
}
app/site-form.component.html 完整代码如下:
app/site-form.component.html 文件:
<
div
class
=
"
container
"
>
<
div
[
hidden
]=
"
submitted
"
>
<
h1
>
网站表单
</
h1
>
<
form
*
ngIf
=
"
active
"
(
ngSubmit
)=
"
onSubmit()
"
#
siteForm
=
"
ngForm
"
>
{{diagnostic}}
<
div
class
=
"
form-group
"
>
<
label
for
=
"
name
"
>
网站名
</
label
>
<
input
type
=
"
text
"
class
=
"
form-control
"
id
=
"
name
"
required
[(
ngModel
)]=
"
model.name
"
name
=
"
name
"
#
name
=
"
ngModel
"
>
<
div
[
hidden
]=
"
name.valid || name.pristine
"
class
=
"
alert alert-danger
"
>
网站名是必需的
</
div
>
</
div
>
<
div
class
=
"
form-group
"
>
<
label
for
=
"
alexa
"
>
alexa 排名
</
label
>
<
input
type
=
"
text
"
class
=
"
form-control
"
id
=
"
alexa
"
[(
ngModel
)]=
"
model.alexa
"
name
=
"
alexa
"
>
</
div
>
<
div
class
=
"
form-group
"
>
<
label
for
=
"
url
"
>
网站 URL
</
label
>
<
select
class
=
"
form-control
"
id
=
"
url
"
required
[(
ngModel
)]=
"
model.url
"
name
=
"
url
"
>
<
option
*
ngFor
=
"
let p of urls
"
[
value
]=
"
p
"
>
{{p}}
</
option
>
</
select
>
</
div
>
<
button
type
=
"
submit
"
class
=
"
btn btn-default
"
[
disabled
]=
"
!siteForm.form.valid
"
>
提交
</
button
>
<
button
type
=
"
button
"
class
=
"
btn btn-default
"
(
click
)=
"
newSite()
"
>
新增网站
</
button
>
</
form
>
</
div
>
<
div
[
hidden
]=
"
!submitted
"
>
<
h2
>
你提交的信息如下:
</
h2
>
<
div
class
=
"
row
"
>
<
div
class
=
"
col-xs-3
"
>
网站名
</
div
>
<
div
class
=
"
col-xs-9 pull-left
"
>
{{ model.name }}
</
div
>
</
div
>
<
div
class
=
"
row
"
>
<
div
class
=
"
col-xs-3
"
>
网站 alexa 排名
</
div
>
<
div
class
=
"
col-xs-9 pull-left
"
>
{{ model.alexa }}
</
div
>
</
div
>
<
div
class
=
"
row
"
>
<
div
class
=
"
col-xs-3
"
>
网站 URL
</
div
>
<
div
class
=
"
col-xs-9 pull-left
"
>
{{ model.url }}
</
div
>
</
div
>
<
br
>
<
button
class
=
"
btn btn-default
"
(
click
)=
"
submitted=false
"
>
编辑
</
button
>
</
div
>
</
div
>
模板中我们把 hidden 属性绑定到 SiteFormComponent.submitted 属性上。
主表单从一开始就是可见的,因为 submitted 属性是 false ,当我们提交了这个表单则隐藏,submitted 属性是 true:
submitted
=
false
;
onSubmit
(
)
{
this
.
submitted
=
true
;
}
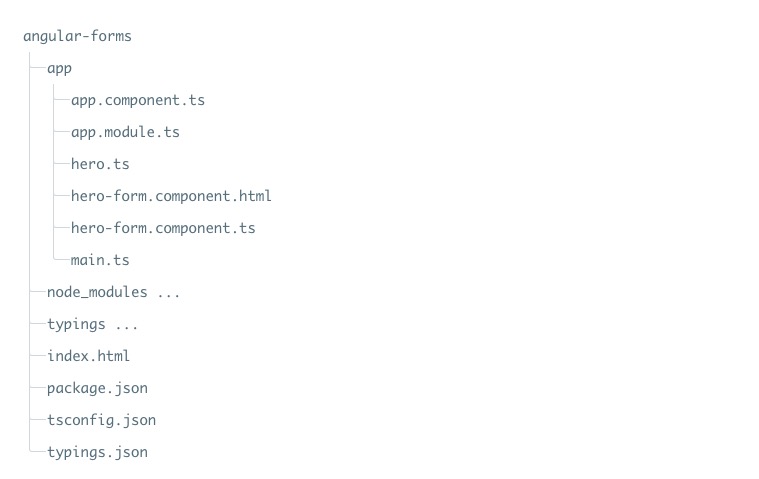
最终的目录结构为:
本文所使用的源码可以通过以下方式下载,不包含 node_modules 和 typings 目录。
源代码下载
完整实例演示 GIf 如下: